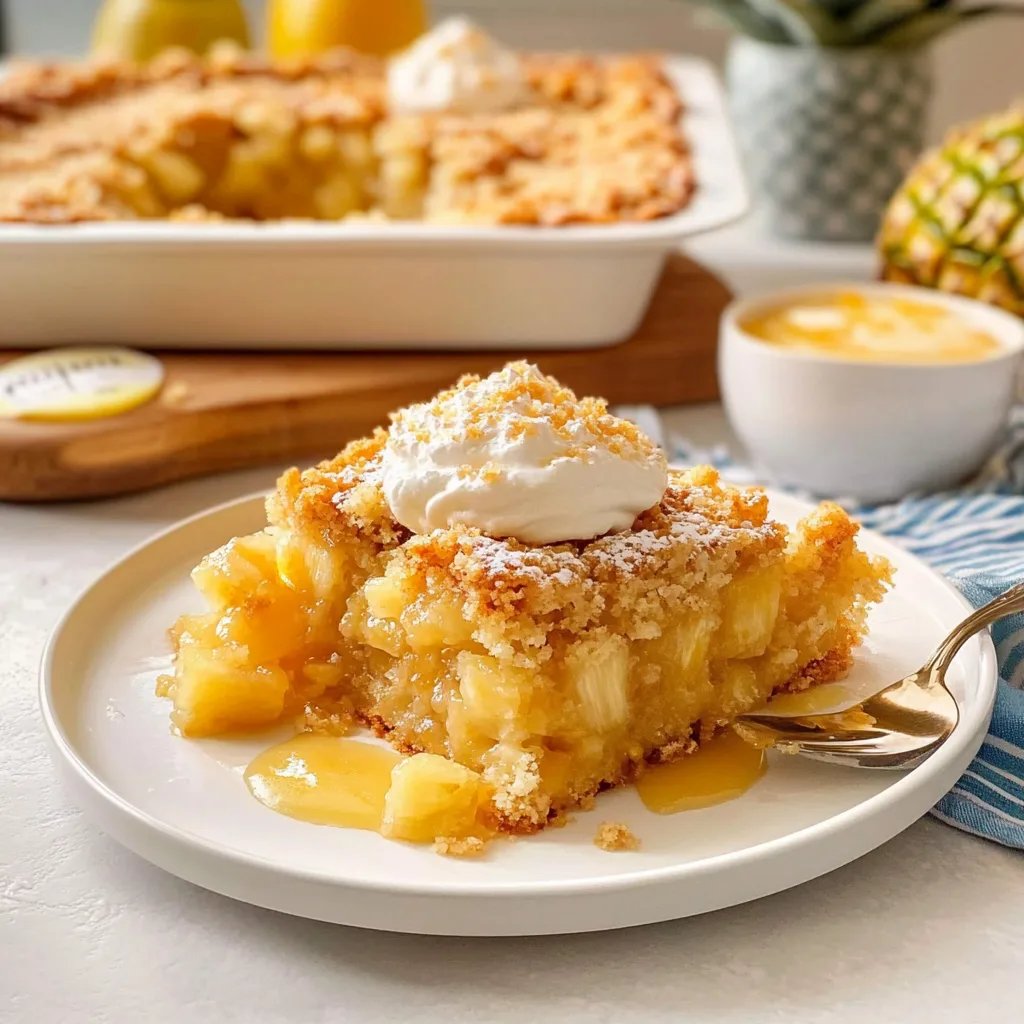
Imagine a warm, golden slice of Pineapple Dump Cake fresh from the oven, its sweet, tropical aroma wafting through the air, inviting you to take that first mouthwatering bite. The delightful combination of juicy pineapple mingling with fluffy cake creates a luscious explosion of flavor and texture that dances on your palate, making it impossible to resist.
Jump to:
Picture this: a casual summer gathering where laughter fills the air and everyone?s eyes light up at the sight of this easy-to-make dessert. With every forkful, you’re transported back to sun-soaked afternoons spent with family, creating cherished memories around the table. This Pineapple Dump Cake isn?t just a treat; it?s an experience that brings people together for birthdays, barbecues, or simply as a sweet pick-me-up on a lazy afternoon.
Why Is Pineapple Dump Cake So Irresistibly Good?
Quick to prepare ? With just 10 minutes of prep time, you can whip up this dessert in no time!
Flavorful layers ? The crushed pineapple mingles beautifully with the buttery yellow cake mix, creating a delightful tropical treat.
Optional crunch ? Add chopped nuts for a satisfying texture that enhances every bite.
Crowd-pleaser ? Perfect for any occasion, this dessert is sure to impress friends and family with its delicious simplicity.
One-pan wonder ? Bake it all in one dish for easy cleanup, making it a go-to recipe for busy days.
Pineapple Dump Cake Ingredients
- For the Fruit Layer
- 1 can crushed pineapple (with juice) ? This will add a deliciously moist base and natural sweetness to your pineapple dump cake.
- For the Cake Mix
- 1 box yellow cake mix ? A simple choice that provides a soft, fluffy texture and a lovely golden color to your dessert.
- For the Topping
- 1/2 cup unsalted butter (melted) ? Melted butter helps create a crunchy topping that contrasts beautifully with the soft fruit layer below.
- Optional Add-In
- 1 cup chopped nuts (optional) ? Adding nuts gives an extra layer of flavor and crunch, making your pineapple dump cake even more delightful.
Step-by-Step Pineapple Dump Cake
1. Preheat the oven to 350?F (175?C). This temperature is perfect for achieving that golden-brown top you’ll love.
2. Spread the crushed pineapple (with juice) evenly on the bottom of a 9×13 inch baking dish. The juicy pineapple will create a delightful base for your cake.
3. Sprinkle the dry yellow cake mix evenly over the pineapple layer. Make sure to cover all the pineapple so it can absorb all those wonderful flavors as it bakes.
4. Drizzle the melted unsalted butter over the cake mix, allowing it to seep through and create a moist texture throughout your dessert.
5. Add chopped nuts on top if desired, adding a crunchy texture and flavor contrast to your Pineapple Dump Cake.
6. Layer without mixing! Simply let each ingredient sit on top of one another for that classic dump cake style.
7. Bake in the preheated oven for 45 minutes or until you see a beautiful golden brown color on top. Your kitchen will smell heavenly!
8. Cool slightly before serving to allow the layers to settle and enhance those delicious flavors even more.
Optional: Serve warm with a scoop of vanilla ice cream for an extra treat!
Exact quantities are listed in the recipe card below.
Expert Tips
- Pineapple Juice: Make sure to use crushed pineapple with juice; it adds moisture and flavor that enhances the Pineapple Dump Cake.
- Layering Ingredients: Spread the pineapple evenly and avoid mixing. This layering is key to achieving the perfect texture while baking.
- Butter Distribution: Drizzle melted butter evenly over the cake mix to ensure a golden, crispy topping without dry spots.
- Nutty Crunch: If using nuts, chop them coarsely and sprinkle them on top for added texture. Toasted pecans or walnuts work wonderfully!
- Baking Time: Keep an eye on your cake as it bakes; ovens vary, and you may need to adjust the time slightly for best results.
- Cooling Period: Let your Pineapple Dump Cake cool slightly before serving; this allows flavors to meld beautifully and makes it easier to cut.
How to Store and Freeze Pineapple Dump Cake
- Room Temperature: Keep your Pineapple Dump Cake covered at room temperature for up to 2 days for the best flavor and texture.
- Fridge: Store any leftover cake in an airtight container in the fridge for up to 5 days. This helps maintain moisture and freshness.
- Freezer: If you want to save it for later, freeze slices of Pineapple Dump Cake in a freezer-safe container for up to 3 months. Thaw overnight in the fridge before enjoying!
- Reheating: To reheat, warm individual slices in the microwave for about 20-30 seconds or until heated through. Enjoy that delightful, gooey goodness again!
Pineapple Dump Cake Your Way
Feel free to get creative and make this dessert your own with these delightful twists!
- Coconut Delight: Substitute half the butter with coconut oil for a tropical flair. This adds a subtle coconut flavor that perfectly complements the pineapple.
- Nutty Crunch: Use your favorite nuts, like pecans or walnuts, in place of chopped nuts. The added crunch will enhance texture and provide a delightful contrast to the soft cake.
- Spiced Up: Add 1 teaspoon of cinnamon or nutmeg to the cake mix for a warm, aromatic twist. These spices bring out the sweetness of the pineapple beautifully.
- Fresh Fruit: Replace canned pineapple with fresh diced pineapple for a brighter, more vibrant flavor. Just be sure to adjust cooking time slightly for freshness!
- Chocolate Lovers: Mix in 1/2 cup of chocolate chips with the cake mix for an indulgent treat. The rich chocolate pairs unexpectedly well with the sweetness of the pineapple.
- Gluten-Free: Use a gluten-free yellow cake mix to create a delicious dessert that’s suitable for everyone. You won?t lose any of the beloved flavors while accommodating dietary needs.
- Extra Juicy: Add 1 cup of sweetened shredded coconut along with the crushed pineapple for extra moisture and sweetness. This will create a luscious, gooey dessert that everyone will love.
- Heat It Up: Sprinkle a pinch of cayenne pepper into the cake mix for an unexpected spicy kick. The warmth will balance beautifully with the sweet pineapple, creating a unique flavor profile.
Make Ahead Options
Pineapple Dump Cake is an ideal dessert for meal prep, allowing you to savor its deliciousness without the last-minute rush. You can prepare the key components ahead of time: store the crushed pineapple in its juice, and keep the dry yellow cake mix and melted butter ready to go. In fact, you can layer the pineapple in a 9×13 inch baking dish and sprinkle the dry cake mix over it up to 24 hours in advance. When you’re ready to indulge, simply drizzle the melted butter on top, add chopped nuts if desired, and bake at 350?F (175?C) for about 45 minutes until golden brown. This way, you?ll have a delightful dessert that?s both time-saving and scrumptious!
Pineapple Dump Cake Questions Answered
What type of crushed pineapple should I use for the best flavor?
For this recipe, it’s best to use a can of crushed pineapple packed in juice rather than syrup. The natural sweetness and acidity from the juice enhances the overall flavor of the cake, giving it that delightful tropical twist that pairs perfectly with the yellow cake mix.
Can I substitute the yellow cake mix with another flavor?
Absolutely! While yellow cake mix is traditional, you can experiment with other flavors like white or even spice cake mix for a unique taste. Just remember that different flavors may alter the final taste slightly, so choose one that complements your love for pineapple!
How long does Pineapple Dump Cake last in the fridge?
Once baked, your Pineapple Dump Cake can be stored in an airtight container in the refrigerator for up to 3-4 days. Just make sure to let it cool slightly before covering it to prevent any condensation from making it soggy.
Can I freeze Pineapple Dump Cake?
Yes! You can freeze Pineapple Dump Cake for up to 2 months. To do so, make sure it’s completely cooled, then wrap it tightly in plastic wrap and aluminum foil. When you’re ready to enjoy it again, thaw it in the refrigerator overnight before serving.
What kind of nuts work well in this recipe?
Chopped pecans or walnuts are excellent choices for adding a bit of crunch to your Pineapple Dump Cake. They not only enhance the texture but also provide a lovely nutty flavor that complements the sweet pineapple beautifully. If you’re not a fan of nuts or have allergies, feel free to skip them altogether!
How can I tell when my dump cake is done baking?
Your Pineapple Dump Cake will be ready when it’s golden brown on top and bubbly around the edges?typically after about 45 minutes at 350?F (175?C). A toothpick inserted into the center should come out clean or with just a few moist crumbs attached. Let it cool slightly before diving in!
Pineapple Dump Cake
Ingredients
Method
- Preheat the oven to 350?F (175?C).
- In a 9x13 inch baking dish, spread the crushed pineapple evenly on the bottom.
- Sprinkle the dry cake mix evenly over the pineapple.
- Drizzle the melted butter over the cake mix.
- If using, sprinkle chopped nuts on top.
- Do not mix; simply layer the ingredients.
- Bake in the preheated oven for 45 minutes or until golden brown.
- Let cool slightly before serving.