It’s a hot summer day, and you’re craving something crunchy, tangy, and utterly delicious. Enter pickled okra: the zesty green spears that can turn any ordinary meal into a flavor explosion. Imagine biting into one of these crunchy delights, their bright green color popping against your plate, the vinegary tang dancing on your taste buds like it’s auditioning for a Broadway show. Whether you’re serving it as a side dish at a family barbecue or munching on it straight from the jar while binge-watching your favorite series, pickled okra is always a winner. For more inspiration, check out this Lazy Girl Pecan Pie Bars recipe.
Jump to:
- Ingredients for pickled okra
- How to Make pickled okra
- <strong>Perfecting the Cooking Process</strong>
- <strong>Add Your Touch</strong>
- <strong>Storing & Reheating</strong>
- FAQs:
- What is pickled okra?
- How do you make pickled okra at home?
- What are some uses for pickled okra?
- Is pickled okra healthy?
- Conclusion for pickled okra:
- 📖 Recipe Card
Now, let?s be real: I didn’t grow up eating okra. Nope! My first encounter was during a potluck where everyone raved about this peculiar green veggie. I decided to jump on the bandwagon and give it a whirl. Little did I know that this crunchy snack would become my go-to solution for impressing guests and satisfying late-night cravings. So, whether you?re hosting friends or just looking for something fun to snack on while you pretend to be an adult, this pickled okra recipe is here to save the day. For more inspiration, check out this Amish Country Casserole Recipe recipe.
Why You'll Love This Recipe
- This pickled okra recipe is incredibly easy to prepare; even kitchen novices can rock it.
- The vibrant flavors will make your taste buds sing with joy in every bite.
- The colorful jars of pickled okra are visually appealing and make perfect gifts or conversation starters at gatherings.
- Plus, they?re versatile enough to be enjoyed on their own or tossed into salads and sandwiches for an extra zing!
Ingredients for pickled okra
Here’s what you’ll need to make this delicious dish:
- Fresh Okra: Choose firm, young pods that are bright green; avoid any with blemishes or wrinkles.
- White Vinegar: This adds the tangy flavor essential for pickling; feel free to experiment with apple cider vinegar too!
- Water: Use filtered water for the best taste; it helps balance the vinegar.
- Salt: Kosher salt works best as it dissolves easily and enhances the overall flavor.
- Sugar: Just a touch of sugar balances the acidity of the vinegar and rounds out the flavors.
- Garlic Cloves: Fresh garlic cloves add depth and aroma; you can slice them or leave them whole.
- Spices (Dill Seeds, Red Pepper Flakes): Customize your spice level with dill seeds for flavor and red pepper flakes for heat.
The full ingredients list, including measurements, is provided in the recipe card directly below.
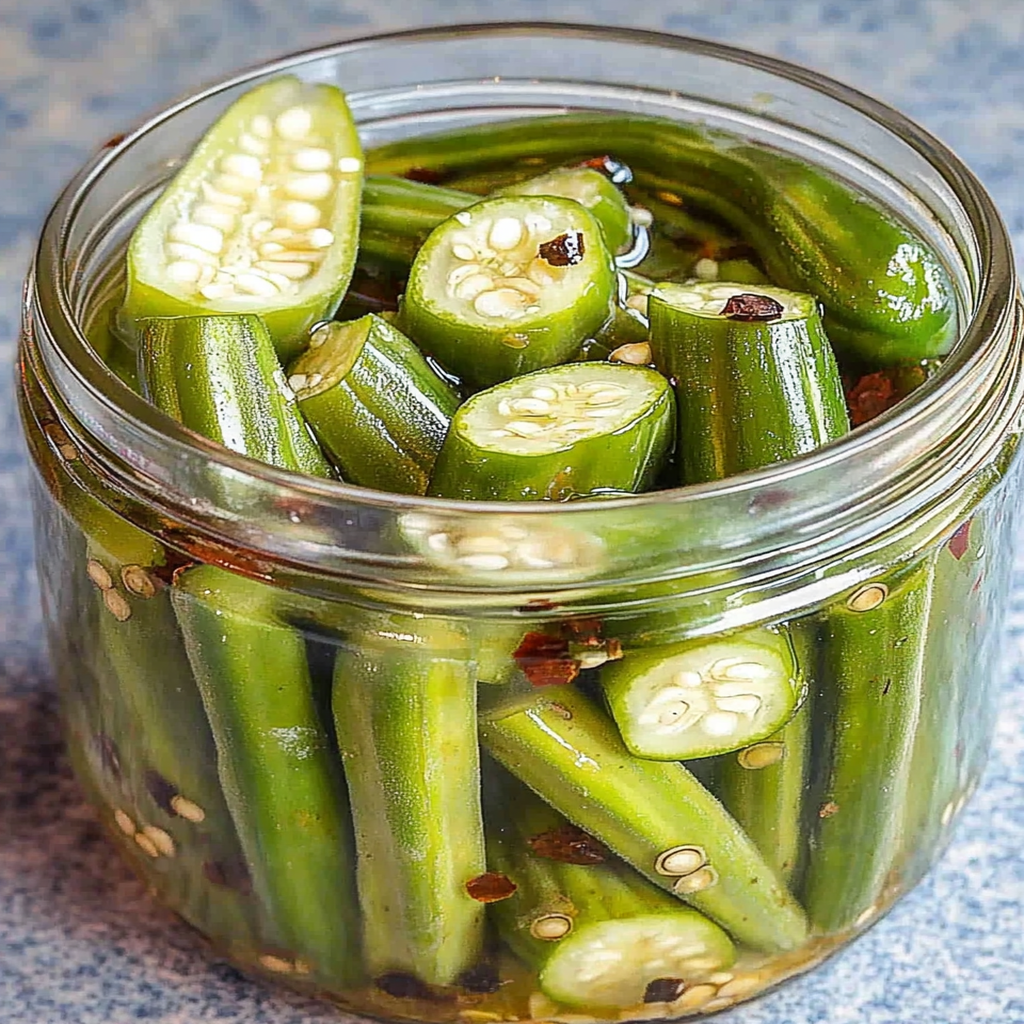
How to Make pickled okra
Follow these simple steps to prepare this delicious dish:
Step 1: Prepare Your Jars
Start by sterilizing your jars in boiling water for about ten minutes?this ensures your pickles stay fresh longer.
Step 2: Prepare the Brine
In a saucepan over medium heat, combine equal parts white vinegar and water. Add salt and sugar until dissolved then bring to a gentle boil.
Step 3: Pack Your Okra
While waiting for the brine, pack your fresh okra tightly in each jar along with garlic cloves and spices of choice?dill seeds work wonders here!
Step 4: Pour in the Brine
Once boiling, carefully pour the hot brine over the packed okra in each jar. Leave about half an inch of headspace at the top.
Step 5: Seal It Up
Wipe down the rims of each jar with a clean cloth before sealing them tightly with lids.
Step 6: Let It Cool
Allow jars to cool at room temperature before transferring them to the fridge. Let them pickle for at least a week (if you can resist) before diving in!
Transfer to plates and enjoy this delightful treat chilled! Pickled okra pairs wonderfully with sandwiches or as part of an appetizer platter alongside cheese and crackers.
With this easy-to-follow recipe in hand, you’re well-equipped to whip up your own batch of crispy pickled okra that will keep everyone coming back for more! Enjoy crunching through those tangy bites while impressing friends with your newfound culinary skills! enhancing your salads.
You Must Know
- This amazing pickled okra recipe is a delightful way to add zing to any meal.
- The crunchy texture and tangy flavor are sure to impress your guests.
- It’s perfect as a snack, side dish, or even an ingredient in salads and sandwiches.
Perfecting the Cooking Process
Start by washing the okra and trimming the ends. Prepare your brine while the jars sterilize. Pack the okra tightly in jars, pour in the hot brine, and seal them up for that perfect pickling experience.
Add Your Touch
Feel free to swap out spices based on your taste preferences. Add garlic cloves, dill sprigs, or even a pinch of red pepper flakes for some kick. The beauty of pickled okra lies in its versatility!
Storing & Reheating
Store your pickled okra in the refrigerator for up to 3 months. No need to reheat; simply enjoy cold or at room temperature straight from the jar!
Chef's Helpful Tips
- For perfectly crunchy pickled okra, choose fresh pods that are young and tender.
- Always use filtered water for your brine to enhance flavors.
- Don?t skip the sterilization step; it?s crucial for preserving your pickles!
Sometimes I whip up a batch of pickled okra just before friends come over, and they always rave about it! It?s become my go-to party trick?who knew veggies could steal the show?
FAQs:
What is pickled okra?
Pickled okra is a delicious way to preserve fresh okra pods. The process involves soaking the pods in a mixture of vinegar, water, and spices, allowing them to absorb flavors while remaining crisp. This tangy treat can be enjoyed as a snack, added to salads, or served as a side dish. perfect taco side dishes The pickling process enhances the natural flavor of okra while providing a unique taste experience. Pickled okra is not only tasty but also versatile and can complement various dishes, making it a great addition to any meal.
How do you make pickled okra at home?
To make pickled okra at home, start by washing fresh okra pods thoroughly. Prepare a brine using equal parts vinegar and water, then add salt and spices such as garlic, dill seeds, or red pepper flakes for extra flavor. Pack the washed okra into sterilized jars and pour the hot brine over them, ensuring they are fully submerged. Seal the jars tightly and let them cool before refrigerating. Allow the flavors to develop over several days before enjoying your homemade pickled okra for the best taste!
What are some uses for pickled okra?
Pickled okra serves various culinary purposes. You can enjoy it straight from the jar as a crunchy snack or appetizer. It makes an excellent addition to salads, adding both texture and flavor. You can also include it in sandwiches and wraps for a delightful twist. pairing with crab salad Furthermore, pickled okra pairs beautifully with charcuterie boards or alongside fried dishes like chicken or fish. Its unique flavor elevates any meal while providing a refreshing contrast that keeps your palate engaged.
Is pickled okra healthy?
Yes, pickled okra is healthy when consumed in moderation. It retains many nutrients found in fresh okra, including vitamins A and C, fiber, and antioxidants. The fermentation process can also promote gut health by introducing beneficial probiotics into your diet. However, be mindful of sodium levels since pickling often involves salt; excessive consumption may impact blood pressure if you’re on a low-sodium diet. Enjoying pickled okra as part of a balanced diet contributes positively to your overall well-being.
Conclusion for pickled okra:
Pickled okra offers a delightful combination of crunch and tanginess that enhances many dishes. Making it at home is simple and allows for customization with different spices according to personal preference. Whether enjoyed straight from the jar or incorporated into various meals, this preserved vegetable adds both flavor and nutrition to your diet. quick vegetable sides With its health benefits and versatility in cooking, incorporating pickled okra into your culinary repertoire is an excellent choice for food enthusiasts!
Did You Enjoy Making This Recipe? Please rate this recipe with ⭐⭐⭐⭐⭐ or leave a comment.
📖 Recipe Card
PrintPickled Okra
- Total Time: 25 minutes
- Yield: Approximately 4 servings 1x
Description
Pickled okra is a crunchy and tangy snack that transforms fresh okra into delightful spears infused with zesty flavors. This easy-to-follow recipe is perfect for barbecues or as a quick, refreshing bite straight from the jar. With its vibrant color and unique taste, pickled okra is sure to impress guests and elevate your culinary creations.
Ingredients
- 1 pound fresh okra (young, firm pods)
- 1 cup white vinegar
- 1 cup filtered water
- 2 tablespoons kosher salt
- 1 tablespoon sugar
- 4 garlic cloves (sliced or whole)
- 1 teaspoon dill seeds
- ? teaspoon red pepper flakes (optional)
Instructions
- Sterilize jars by boiling them in water for about ten minutes.
- In a saucepan, combine vinegar and water over medium heat. Add salt and sugar, stirring until dissolved, then bring to a gentle boil.
- Pack the fresh okra tightly into sterilized jars along with garlic and spices.
- Carefully pour hot brine over the packed okra, leaving half an inch of headspace.
- Wipe the jar rims, seal tightly with lids, and allow to cool at room temperature.
- Refrigerate for at least one week before enjoying.
- Prep Time: 15 minutes
- Cook Time: 10 minutes
- Category: Snack/Side
- Method: Pickling
- Cuisine: Southern
Nutrition
- Serving Size: 4 oz (113g)
- Calories: 45
- Sugar: 2g
- Sodium: 350mg
- Fat: 0g
- Saturated Fat: 0g
- Unsaturated Fat: 0g
- Trans Fat: 0g
- Carbohydrates: 10g
- Fiber: 3g
- Protein: 2g
- Cholesterol: 0mg