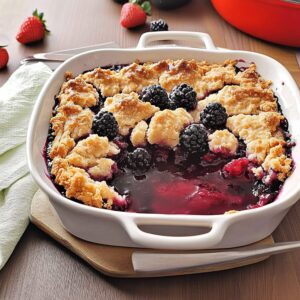
Imagine sinking your teeth into a fudgy Cherry Chocolate Brownie, where luscious chocolate meets the tart sweetness of cherries, creating a delightful explosion of flavors that dances on your taste buds. The aroma wafts through the air, teasing you with promises of indulgence as the rich, moist texture melts in your mouth, making it impossible to resist another bite.
Jump to:
- Why Is Cherry Chocolate Brownies So Irresistibly Good?
- Cherry Chocolate Brownies Ingredients
- Directions: Cherry Chocolate Brownies
- Tips for the Best Cherry Chocolate Brownies
- How to Store and Freeze Cherry Chocolate Brownies
- Cherry Chocolate Brownies Your Way
- Make Ahead Options
- Cherry Chocolate Brownies Recipe FAQs
These Cherry Chocolate Brownies are not just a dessert; they are a nostalgic nod to family gatherings, where laughter and joy mingled with the scent of baking. Perfect for cozy evenings or festive celebrations, these brownies are bound to elevate any occasion and leave everyone craving more of their irresistible charm. Get ready for a flavor experience that will have you dreaming about this delectable treat long after the last bite!
Why Is Cherry Chocolate Brownies So Irresistibly Good?
Decadent flavors come together in every bite with rich chocolate and tart cherries, creating a dessert experience like no other. Easy to make, these brownies require just 15 minutes of prep time, making them perfect for last-minute cravings or gatherings. Versatile enough to satisfy any palate, they?re sure to impress your guests at parties or cozy family dinners. Crowd favorites, these Cherry Chocolate Brownies are always a hit, appealing to both chocolate lovers and fruit enthusiasts alike. With a delightful blend of textures and flavors, you?ll find yourself reaching for seconds!
Cherry Chocolate Brownies Ingredients
For the Brownie Base
- 1 cup granulated sugar ? Sweetens the brownies and helps create a delightful crust on top.
- 1/2 cup unsalted butter (melted) ? Adds richness and moisture to the brownie mixture.
- 2 large eggs ? Provides structure and helps bind all the ingredients together.
- 1 teaspoon vanilla extract ? Enhances the chocolate flavor and adds warmth to the overall taste.
- 1/3 cup unsweetened cocoa powder ? Delivers a deep chocolate flavor, making these brownies truly decadent.
- 1 cup all-purpose flour ? Gives the brownies their structure while keeping them soft and fudgy.
- 1/4 teaspoon salt ? Balances sweetness and enhances the chocolate flavor beautifully.
- 1/2 cup chocolate chips ? Adds extra bursts of chocolate goodness in every bite of these Cherry Chocolate Brownies.
For the Cherry Topping
- 1 cup fresh or frozen cherries (pitted and halved) ? Provides a tart contrast that perfectly complements the rich chocolate.
- 2 tablespoons granulated sugar ? Helps draw out the juices from the cherries, creating a lovely syrupy topping.
- 1 tablespoon lemon juice ? Brightens the cherry flavor, adding a refreshing zing to balance the sweetness.
Directions: Cherry Chocolate Brownies
1. Combine In a small bowl, combine the fresh or frozen cherries (1 cup), granulated sugar (2 tablespoons), and lemon juice (1 tablespoon). Let this mixture sit to macerate while you prepare the brownie batter, enhancing the cherry flavor.
2. Preheat Preheat your oven to 350?F (175?C) and grease a baking pan. This step ensures that your brownies won?t stick and will come out beautifully once baked.
3. Whisk In a mixing bowl, whisk together granulated sugar (1 cup) and melted unsalted butter (1/2 cup) until smooth. The mixture should look glossy and well combined, creating a rich base for your brownies.
4. Add Next, add in the two large eggs and vanilla extract (1 teaspoon). Whisk until everything is well blended; this adds moisture and depth to your brownie mix.
5. Sift Sift in the unsweetened cocoa powder (1/3 cup), all-purpose flour (1 cup), and salt (1/4 teaspoon). Stir until just combined?don?t overmix! You want your batter thick and fudgy.
6. Fold Gently fold in the chocolate chips (1/2 cup) into the brownie batter. These little morsels will melt into gooey pockets of chocolate bliss as they bake!
7. Pour Pour half of the brownie batter into your prepared baking pan, smoothing it out evenly across the bottom for a nice foundation.
8. Spread Spread the cherry mixture evenly over the brownie batter, allowing that tart sweetness to integrate beautifully with the rich chocolate below.
9. Top Carefully dollop the remaining brownie batter on top of the cherries, spreading it gently to cover them completely. This creates a delicious layer of chocolate goodness.
10. Bake Bake in your preheated oven for 25-30 minutes or until a toothpick inserted in the center comes out with a few moist crumbs. Enjoy watching them rise and develop that beautiful crust!
11. Cool Allow to cool before cutting into squares. This helps set the texture and makes for easier serving?patience pays off here!
Optional: For an extra touch, dust with powdered sugar before serving.
Exact quantities are listed in the recipe card below.
Tips for the Best Cherry Chocolate Brownies
- Butter Temperature: Use melted butter at room temperature to ensure it blends smoothly with the sugar, creating a luscious brownie base.
- Egg Mixing: Whisk the eggs until they are light and frothy; this helps incorporate air, leading to a chewier texture in your Cherry Chocolate Brownies.
- Sifting Dry Ingredients: Always sift cocoa powder and flour together to eliminate lumps, ensuring a silky batter that bakes evenly without any pockets of bitterness.
- Cherry Preparation: Allow the cherries to macerate long enough to release their juices; this enhances their flavor and prevents them from sinking during baking.
- Baking Time Awareness: Keep an eye on your brownies in the last few minutes; overbaking can lead to dry edges while cutting into squares when still slightly warm yields a fudgy center.
- Cooling Patience: Let the brownies cool completely before slicing. This helps them set properly and makes for cleaner cuts that showcase those beautiful cherry layers.
How to Store and Freeze Cherry Chocolate Brownies

- Room Temperature: Keep your Cherry Chocolate Brownies in an airtight container for up to 3 days to maintain their fudgy texture and rich flavor.
- Fridge: For longer freshness, store brownies in the refrigerator for up to 1 week. Wrap them tightly in plastic wrap or place them in a sealed container.
- Freezer: Freeze your brownies for up to 3 months. Cut them into squares, wrap each piece individually, and place them in a freezer-safe bag.
- Reheating: To enjoy your brownies warm, microwave a piece for about 15-20 seconds. This will revive that delicious gooeyness!
Cherry Chocolate Brownies Your Way
Feel free to get creative and make this delicious treat truly your own with these fun twists!
- Gluten-Free: Substitute all-purpose flour with a 1:1 gluten-free baking mix. This allows everyone to enjoy the fudgy delight without worry. The texture remains rich and satisfying, perfect for those avoiding gluten.
- Nutty Addition: Add 1/2 cup of chopped walnuts or pecans to the brownie base. This introduces a delightful crunch that contrasts beautifully with the soft chocolatey texture, enhancing every bite.
- Minty Fresh: Mix in 1/4 teaspoon of peppermint extract along with the vanilla. This will give your brownies an invigorating twist that pairs wonderfully with the cherries, making each piece feel like a celebration.
- Spicy Kick: Stir in 1/2 teaspoon of cayenne pepper or cinnamon to the batter. A hint of spice can elevate the flavor profile, creating a warm sensation that complements the tartness of the cherries perfectly.
- Rich Espresso: Incorporate 1 tablespoon of instant coffee granules into the melted butter. The coffee deepens the chocolate flavor, offering a sophisticated edge that chocolate lovers will appreciate.
- Vegan Delight: Replace eggs with 1/4 cup of unsweetened applesauce and use coconut oil instead of butter. These swaps maintain moisture and create a wonderfully chewy brownie without any animal products.
- Chunky Chocolate: Instead of chocolate chips, chop up your favorite chocolate bar into chunks. This variation adds more texture and surprises, as you?ll encounter gooey pockets of melted chocolate throughout each slice.
- Berry Blast: Swap out cherries for raspberries or blueberries if you’re feeling adventurous. Each berry brings its unique sweetness and tang, resulting in a delightful new flavor experience while keeping it fruity!
Make Ahead Options
Preparing Cherry Chocolate Brownies in advance is a fantastic way to ensure you have a delicious dessert ready whenever the craving strikes. You can make the brownie base up to 24 hours ahead by whisking together 1 cup of granulated sugar, 1/2 cup of melted unsalted butter, 2 large eggs, and 1 teaspoon of vanilla extract. Once combined, sift in 1/3 cup of cocoa powder, 1 cup of all-purpose flour, and 1/4 teaspoon of salt, folding in 1/2 cup of chocolate chips last. The cherry topping can be prepared earlier as well?just combine 1 cup of pitted and halved cherries with 2 tablespoons of sugar and 1 tablespoon of lemon juice in a small bowl and let it macerate for up to 3 days. When ready to serve, simply layer the batter and cherry mixture as directed, then bake for 25-30 minutes until perfectly fudgy. By planning ahead, you save time and guarantee that these decadent Cherry Chocolate Brownies will impress your family or guests!
Cherry Chocolate Brownies Recipe FAQs
What type of cherries should I use for my Cherry Chocolate Brownies?
You can use either fresh or frozen cherries for this recipe! If using fresh cherries, make sure they are ripe and sweet. For frozen cherries, just ensure they are pitted and halved; there?s no need to thaw them before using, as they?ll bake beautifully right from the freezer.
How should I store leftover brownies?
To keep your brownies fresh, store them in an airtight container at room temperature for up to 3 days. If you’d like to extend their shelf life, refrigerate them for up to a week. Just make sure to bring them back to room temperature before serving for the best flavor and texture!
Can I freeze my Cherry Chocolate Brownies?
Absolutely! To freeze your brownies, wrap them tightly in plastic wrap or aluminum foil and place them in a freezer-safe bag. They can be stored in the freezer for up to 2 months. When you?re ready to enjoy them, simply let them thaw in the refrigerator overnight or at room temperature for a couple of hours.
What if my brownies are too dry?
If your brownies turn out too dry, it may be due to overbaking. Keep an eye on your brownies while they bake; they should come out when a toothpick inserted into the center has a few moist crumbs clinging to it. If you find yourself with dry brownies, try serving them with a scoop of vanilla ice cream or a drizzle of chocolate sauce for added moisture!
How many servings does this recipe yield?
This delightful recipe makes about 4 generous servings?perfect for sharing with family or friends! You can easily double the recipe if you?re looking to serve more people or simply want extra deliciousness on hand.
Can I substitute ingredients in this brownie recipe?
Certainly! If you’re looking for a healthier option, consider swapping granulated sugar for coconut sugar or using unsweetened applesauce instead of butter. For those following a gluten-free diet, you can replace all-purpose flour with a 1: 1 gluten-free flour blend. Just remember that these substitutions may slightly alter the texture and flavor of your brownies.